
Table of Contents
- Why Measuring Non-Standard Window Openings Correctly Matters
- Essential Tools for Measuring Window Openings
- Step-by-Step: How to Measure Window Reveals and Dimensions
- Accounting for Clearance and Tolerances in Window Fitting
- Measuring Irregular and Non-Standard Shapes
- Recording and Verifying Your Measurements
- Common Mistakes to Avoid When Measuring
- Conclusion
Last Updated: August 13, 2026
Why Measuring Non-Standard Window Openings Correctly Matters
Getting measurements right for non-standard window openings avoids costly mistakes that surface months after installation. A window that doesn't fit properly creates drafts, water ingress, and structural issues. This is especially critical for Victorian terraces, period properties, and modern extensions with irregular geometry.
Standard rectangular openings follow predictable patterns. Non-standard shapes, arched windows, bay windows, angled reveals, require a different approach entirely. At Arborfield Joinery, we've worked with hundreds of properties where measurements were off by just a few millimetres, yet those gaps would have compromised the entire installation.
Unlike stock windows, custom-made units can't be easily adjusted on site. Your measurements become the blueprint for manufacturing. If the reveal depth is recorded incorrectly or wall thickness is missed, the finished window either won't fit or will fit with unacceptable gaps. This guide walks you through the exact process professionals use to measure non-standard window openings accurately, covering everything from basic rectangular shapes to complex irregular geometries.
Essential Tools for Measuring Window Openings
You don't need expensive equipment, but you do need the right tools for precision beyond eyeballing distances.
Steel measuring tape (5-8 metres): Your primary tool. Cloth or plastic tapes stretch over time and give inconsistent readings. Steel holds its shape and provides reliable measurements.
Spirit level: Critical for checking whether the sill and lintel are truly level and plumb. Non-standard openings often sit at angles or on uneven surfaces. A spirit level reveals whether you're working with a true opening or one that's twisted or sloping.
Measuring rule or straightedge: A rigid 1-metre rule checks for dips, bulges, or irregular surfaces within the opening. Many older properties have walls that aren't flat. A straightedge reveals these imperfections, which you'll need to account for during installation.
Laser measure: For multiple non-standard openings or larger projects, a laser measure saves time and improves accuracy by eliminating tape sag and human error.
Notebook and pencil: Record every measurement as you take it. Sketch the opening shape, label all dimensions, and note irregularities. A digital photo of your notes serves as backup.
Flexible measuring tape or profile gauge: For arched or curved openings, a flexible tape captures the exact curve that standard rigid tapes cannot follow accurately.
Step-by-Step: How to Measure Window Reveals and Dimensions
The reveal is the distance from the outer face of the wall to the inner face of the window frame, how deep the window sits within the opening. Understanding reveals is fundamental to measuring non-standard window openings correctly.
Measuring Width at Three Points
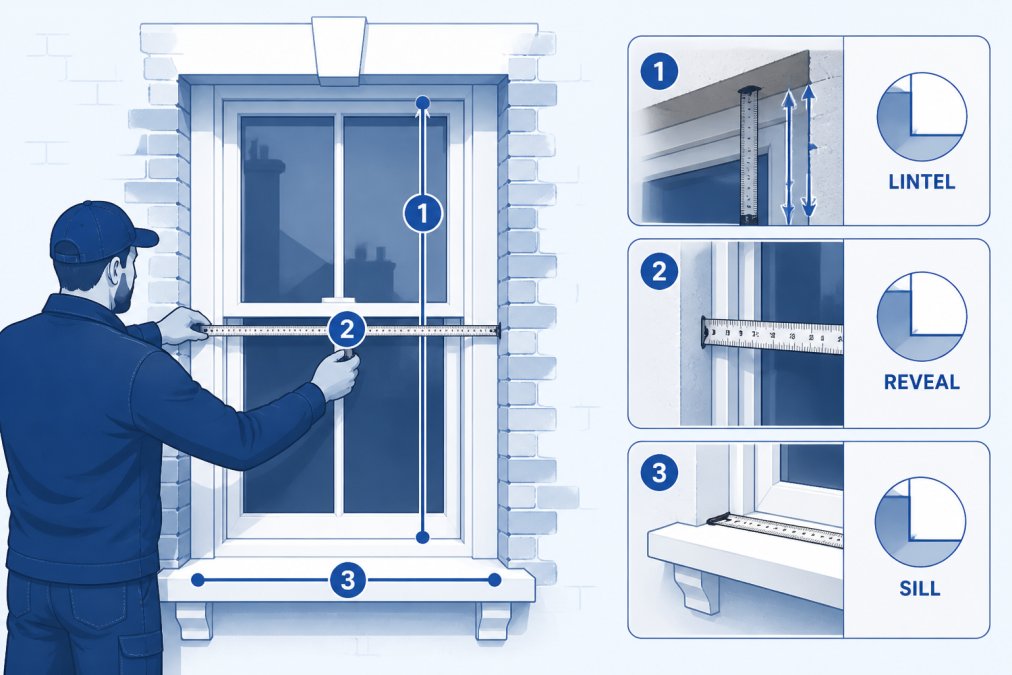
Width measurements must be taken at three distinct points: top, middle, and bottom of the opening. This reveals whether the opening is perfectly rectangular or tapered.
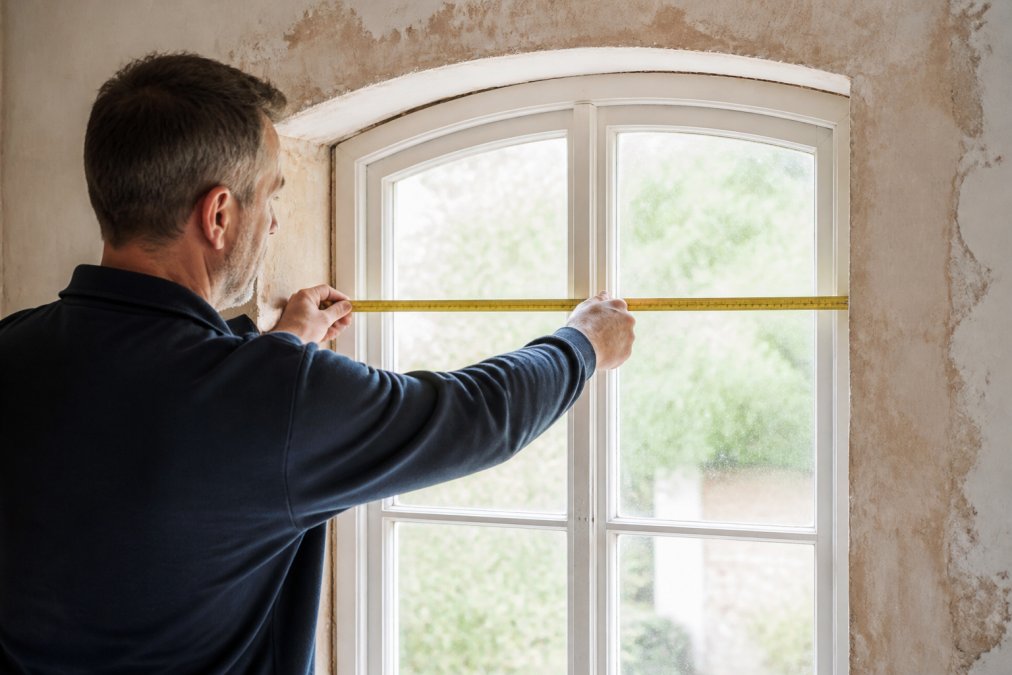
Measure the internal width from left reveal to right reveal at the lintel level (the horizontal support above the window). Record this as "Width Top." Use your spirit level to confirm you're measuring horizontally.
Move to the middle of the opening and measure the same distance. Record as "Width Middle." If this differs from the top measurement, your opening is tapered.
Measure at the bottom, at sill level. Record as "Width Bottom." Compare all three measurements. If they're identical, you have a true rectangular opening. If they vary, document the differences precisely, your window manufacturer needs this information to create a frame that accommodates the taper.
Measuring Height at Three Points
Height measurements follow the same principle: take readings at left, centre, and right positions.
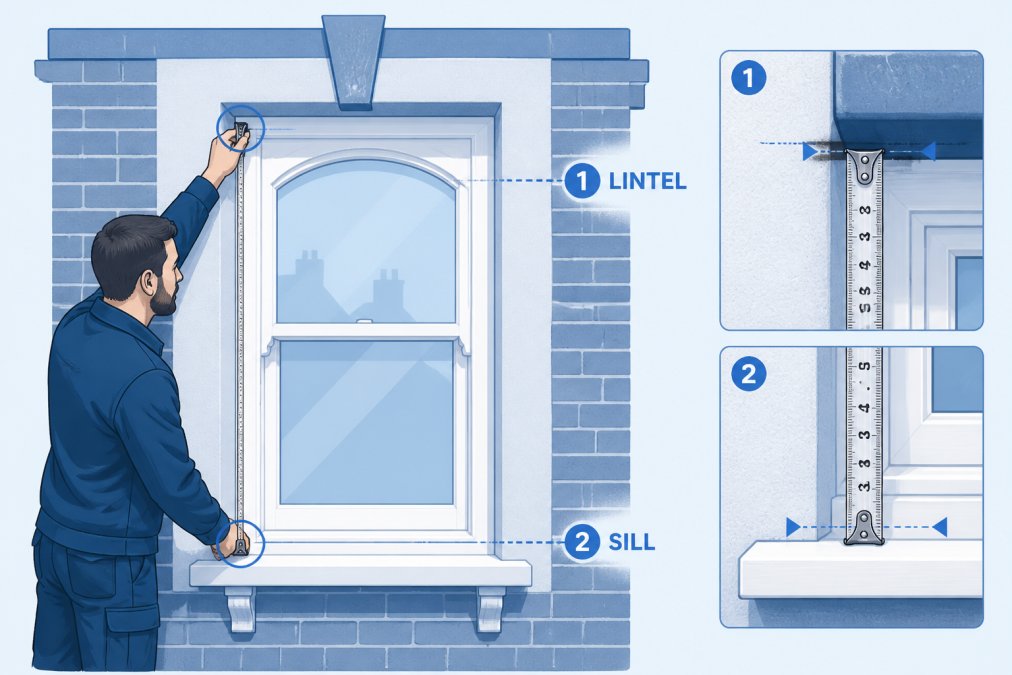
Measure the height from sill to lintel on the left side. Record as "Height Left." Use your spirit level to confirm vertical plumb.
Move to the centre and measure again. Record as "Height Centre."
Measure on the right side. Record as "Height Right." Non-standard openings frequently have height variations. If all three heights differ, the opening is out of plumb, leaning, or twisted, common in period properties and requiring careful attention during installation.
Measuring Depth and Reveal
Measure from the outer face of the external wall to the inner face of the internal wall. This is your total depth and defines how much space you have for the window frame and installation materials.
Next, measure the reveal on each side: from the outer wall face inward to where the window frame will sit. Record left reveal, centre reveal, and right reveal. Reveals often vary in older properties where walls have been plastered unevenly.
Check the depth at multiple points, top, middle, and bottom. Walls aren't always uniform, and a wall thicker at the top than the bottom changes how your window frame must be positioned.
Accounting for Clearance and Tolerances in Window Fitting
Clearance is the gap between the finished window frame and the opening. Tolerances are the acceptable variations in measurement that won't compromise fit or function.
Building standards typically call for a minimum 5-10mm clearance on all sides, though this varies depending on the window type and installation method. This gap allows for minor variations in the opening, adjustment during installation, and thermal movement of the frame material.
When you measure non-standard window openings, deduct this clearance from your internal measurements before ordering. If your opening width is 1200mm and you need 10mm clearance on each side, your window frame width should be 1180mm.
Tolerances account for measurement uncertainty and minor imperfections. A tolerance of ±2mm is typical for domestic windows. However, non-standard openings often have larger tolerance ranges because they're inherently less precise. Document any irregularities, bulges, dips, or uneven surfaces, and discuss these with your window manufacturer. Always communicate your clearance and tolerance assumptions to the manufacturer to avoid gaps that compromise weather tightness or frames that don't fit.
Measuring Irregular and Non-Standard Shapes
Rectangular openings are straightforward. Irregular shapes demand additional steps and often require specialist equipment or advice.
Arched and Circular Window Openings
Arched windows appear frequently in period properties and contemporary designs. The challenge is capturing the curve accurately so the window frame can be manufactured to match.
Start by measuring the width at the widest point (typically at the base of the arch) and the height from the base to the highest point of the curve. These define the overall bounding box.
Map the curve using a flexible measuring tape or profile gauge placed against the curve, then transfer this profile to paper or photograph it. Alternatively, take multiple height measurements at regular intervals across the width, for example, on a 1200mm-wide arch, measure at 0mm, 300mm, 600mm, 900mm, and 1200mm. Plot these points to create a curve map the manufacturer can work from.
For circular windows, measure the diameter at multiple angles. A true circle shows the same diameter regardless of angle. If measurements vary, the opening is elliptical, record both the longest and shortest diameters.
Bay Windows and Angled Reveals
Bay windows project outward from the wall, creating complex geometry. Measure each flat section as you would a standard opening: width at three points, height at three points, depth. Record these separately for each face.
Measure the angles where faces meet using a protractor or angle finder. Bay windows commonly sit at 90 degrees (square bay) or 135 degrees (angled bay), but variations exist. The angle affects how window frames are joined at corners.
Measure the overall projection of the bay and the depth variation from top to bottom. A reveal that narrows as it goes up requires a tapered frame, which is more complex to manufacture.
Recording and Verifying Your Measurements
Accurate recording prevents costly errors downstream. Create a sketch of the opening roughly to scale and label all dimensions directly on it. Include notes about irregularities, plaster bulges, uneven surfaces, or damaged areas that might affect installation.
Take photographs from multiple angles, outside, inside, and close-ups of problem areas. Photos provide visual reference that supplements written measurements and help manufacturers identify issues that numbers alone might not convey.
Double-check every measurement. If two readings differ, investigate why. Resolve discrepancies before you leave the site.
Verify that measurements make sense relative to each other. If width varies significantly between top and bottom, confirm this is intentional and not a measurement error.
Transfer measurements to a formal record including property address, date, opening location, and all dimensions with units clearly marked. Add notes about material conditions, access issues, or special requirements. Share this record with your window manufacturer and installer, asking them to confirm the measurements are sound and that they can manufacture and install windows to these specifications.
Common Mistakes to Avoid When Measuring
Measuring only at one point: Taking width or height at just one location misses tapers and irregularities. Always measure at three points.
Forgetting to account for clearance: Ordering a window frame the exact size of the opening leaves no room for installation adjustments or thermal movement. Always deduct clearance before ordering.
Confusing internal and external dimensions: Know which you need and be consistent. For bespoke windows, manufacturers typically work from internal dimensions.
Ignoring wall thickness: The reveal depth depends on wall thickness. Measure actual depth, not assumed depth.
Not checking for plumb and level: A wall that leans or a sill that slopes affects how the window sits and functions. Use a spirit level to identify these issues.
Measuring over damaged areas: If the opening has cracks or spalling plaster, measure the opening as it will be after repair, not as it currently is.
Recording measurements carelessly: Record exact figures. A measurement of 1197mm or 1203mm is more useful than a rounded approximation.
Failing to photograph: Photos create a record that supplements written measurements and are invaluable if questions arise later.
Not discussing non-standard features with the manufacturer: If your opening has an unusual shape, severe taper, or damage affecting installation, mention it explicitly when you order.
Conclusion
Measuring non-standard window openings accurately is the foundation of a successful installation. The process demands attention to detail, the right tools, and a systematic approach. Whether you're working with a Victorian arch, a bay window, or a modern irregular opening, the principles remain the same: measure at multiple points, account for clearance and tolerances, and document everything thoroughly.
At Arborfield Joinery, we work with homeowners, builders, and architects on complex non-standard projects regularly. Our team combines traditional craftsmanship with precision manufacturing to create windows that fit perfectly, even in challenging openings. When you're ready to order bespoke timber windows or doors for your non-standard opening, we'll guide you through the measurement process and ensure your specifications are captured accurately. With over 70 years of experience and full manufacturing facilities on site, we deliver custom joinery solutions that work. Shop now and discover how our expertise can transform your project.
| Measurement Type | Points to Take | Key Consideration |
|---|---|---|
| Width | Three (top, middle, bottom) | Identifies tapers; ensures frame fits across entire height |
| Height | Three (left, centre, right) | Reveals out-of-plumb walls; ensures frame height is correct |
| Depth/Reveal | Multiple points (top, middle, bottom) | Accounts for wall thickness variation; affects installation method |
| Clearance | All sides | Typically 5-10mm; deduct from opening dimensions before ordering |
| Curve (arched openings) | Profile or multiple interval heights | Captures exact arch shape for custom frame manufacturing |
| Angles (bay windows) | At each corner | Determines how frames join; affects overall fit |
Frequently Asked Questions
Should I measure non-standard window openings from the inside or outside?
Always measure from inside the room where the window will be installed. This gives you the actual aperture size and accounts for wall thickness. Take measurements at the lintel (top), sill (bottom), and at mid-height to check for plumb. The internal dimensions ensure your bespoke frame fits the masonry opening correctly and allows room for installation gaps and expansion tolerances.
What allowance for window fitting should I include in my measurements?
Allow 10-15mm clearance on each side of the frame for installation and expansion. This tolerance accommodates settling, thermal movement, and the installation process itself. Deduct this from your internal opening measurements before specifying your bespoke window size. For non-standard shapes, discuss specific tolerances with your joinery supplier, as irregular openings may require different allowances depending on wall construction and finish.
How do I measure window reveals for Victorian or period properties?
Reveals are the sides of the opening between the masonry and the interior wall finish. Measure the depth of the reveal at the top, middle, and bottom, period properties often have uneven reveals due to settlement. Note whether the reveal is plumb (vertical) using a spirit level. Record plaster thickness separately, as it affects frame positioning. These measurements ensure your bespoke window sits properly and finishes align with the existing wall.
What's the difference between measuring the structural opening and the manufacturing size?
The structural opening is the raw aperture in the masonry, what you measure on site. The manufacturing size is smaller: it accounts for installation clearances, expansion gaps, and tolerances. For example, a 1200mm wide structural opening becomes approximately 1170-1180mm for the actual frame manufacturing. Your joinery supplier will confirm the exact manufacturing dimensions based on your site measurements and their installation requirements.
This article was written using GrandRanker
Share:
Wooden Front Doors: UK Homeowner’s Buying Guide 2026
The Homeowner’s Guide to Timber Windows: Quality, Style, and Longevity in 2026